Posts tonen met het label r/c. Alle posts tonen
Posts tonen met het label r/c. Alle posts tonen
zondag 24 juli 2011
maandag 5 oktober 2009
E-Sky Honeybee FP - upgrades & modifications
 I've repaired my honeybee FP
 It's got a different look. I took the whole machine apart, bit by bit and rebuilt it.
It has a new, red canopy.
 The tail fin has moved forward so it doesn't block any air from the tailrotor.
 New skids (Extreme-Parts). They can take bad landings better than the stock skids.
 The flybar paddles are centered.
 A heat-sink installed on the tailmotor. In order to replace the tail boom I had to solder the wires on the tailmotor.
 A heat-sink on the main motor.
  To mount the battery I use now two rubber bands.
  The battery mounted. Right under the 4 in 1.
 With the red canopy on.
 An orange antenna pipe.
 Checking the helicopter indoor. The honeybee flies just FINE ! ! !
woensdag 2 september 2009
My heli's stay on the ground.
 The Honeybee against the blue sky.
 The Dauphin indoor flight.
 Both helicopters need repairs at the moment. I need 2 new motors for the Dauphin but they are hard to get. Out of stock.
 The Honeybee FP needs a new flybar and a new tail boom. Flybars are also out of stock and I've used up the bars of the training gear.
 zondag 2 augustus 2009
E-Sky Honeybee FP - Flybar repairs.
 I had some practice flying the Honeybee FP so I removed the training gear set with the 4 ping-pong balls. That soon resulted in a crash and a broken flybar.
 I have no spare flybar but I thought I could use a stick from the training gear set.
 I had to find out how to remove the broken flybar first. It's tightened with two screws pointing down.
 I cut the stick from the training gear set to the correct length and assembled the flybar with the paddles
 The flybar was centered and no adjustements had to be made. The Honeybee is good to fly again. ! (Hopefully)
 That flies ok... till I made a piloting mistake.. and down the yellow Honeybee went.
 That looks not too bad. Putting the battery back in its place.
 The main blades go back in their place. Checking everything for a last time and then then...
 Airborne again ! ! !
I've crashed many times already but I consider crashing part of the learning curve.
Flying the E-sky Honeybee FP is a lot more difficult than flying a coaxial helicopter but I'm starting to get the hang of it.
Flying this helicopter is a certain feeling that you have to become used to. It's like learning to ride a bicycle. Once you get it, you cannot unlearn it. It takes practice to improve.
(pictures my bro and me)
maandag 27 juli 2009
The E-Sky Honeybee FP. (Fixed Pitch)
 A package came in. Yeah my new helicopter has arrived.
 Let's see what's in this box. Some spare parts and a training set.
 Nice picture on the box. Would the content of the box be as good ?
 Flying manual + Simulator software + List of all parts used in the Honeybee FP.
That looks great !!!
 It came with a lipo battery. I ordered an other type of battery at the same time but I can't charge that one. I've got no charger. It also came without an adapter for the lipo charger. I had one for the E-Sky Dauphin.
 Posing while it's still undamaged ;-))
 With the training set installed. Ready for its maiden flight.
That didn't end up well !
woensdag 1 juli 2009
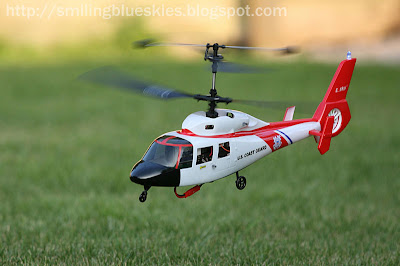
Pictures of the E-Sky Dauphin flying.
Here are some pictures of an airborne E-sky Dauphin. This is the result of a short photo shoot. These pictures are taken by my brother who has done a great job !
 The wheels leave the lawn. The helicopter is in the air.
 Turning and gaining height.
 Hovering in front of the camera lens.
 Taking off to higher places.
 I must mind the wind here. It's evening, the setting sun shines on the Dauphin.
 All is under control and the sky is blue...
 ... and there's one happy pilot smiling :-)
 Battery power is lowering ... time to descent.
 Slowly coming down ...
 Guiding the machine in ...
 On its way to the Landing Zone. This was a fun flight ! ! !
! Many thanks Bro for the pictures !
dinsdag 30 juni 2009
Replacing the fuselage of the E-Sky Dauphin. (step by step)
 The new fuselage in front of the old one.
 First I took off the stabilizer.
 I took off all the blades. (notice the damaged tips) You only need to remove 4 screws and the blades come off.
 All blades are taken off. This heli won't fly far.
  I removed the 1st pin that holds the fuselage to the inner frame.
 This is the second pin.
 Two pins taken off.
  This is the inner body of the helicopter.
The swash plate.
 This picture reminds me of two famous Hollywood robots :
 The led on the old fuselage is still connected.
  I took out the little plug that connects the led light on top of the tail.
 The one connected to the new fuselage went in.
 I connected a battery to check if the led worked... It didn't :-((
 I had connected the plug upside down. In this picture it is done correctly.
 The led flashes.
  I taped the wire back to the frame.
  I put the pins back in place and the blades back on. Job done ! ! !
 A few pictures of the Dauphin in its new clothes.
  I think the helicopter looks great !
I've made an appointment with my dear brother who's a photographer. We're gonna do a little photo shoot of the Dauphin in action.
I can't hardly wait to fly this beauty !
Abonneren op:
Posts (Atom)

