vrijdag 18 september 2009
WOW ! ! !
I came across this video on Youtube. It's only 10 seconds. If you like helicopters, you're gonna like this !!!

woensdag 2 september 2009
My heli's stay on the ground.
 The Honeybee against the blue sky.
 The Dauphin indoor flight.
 Both helicopters need repairs at the moment. I need 2 new motors for the Dauphin but they are hard to get. Out of stock.
 The Honeybee FP needs a new flybar and a new tail boom. Flybars are also out of stock and I've used up the bars of the training gear.
 zondag 2 augustus 2009
E-Sky Honeybee FP - Flybar repairs.
 I had some practice flying the Honeybee FP so I removed the training gear set with the 4 ping-pong balls. That soon resulted in a crash and a broken flybar.
 I have no spare flybar but I thought I could use a stick from the training gear set.
 I had to find out how to remove the broken flybar first. It's tightened with two screws pointing down.
 I cut the stick from the training gear set to the correct length and assembled the flybar with the paddles
 The flybar was centered and no adjustements had to be made. The Honeybee is good to fly again. ! (Hopefully)
 That flies ok... till I made a piloting mistake.. and down the yellow Honeybee went.
 That looks not too bad. Putting the battery back in its place.
 The main blades go back in their place. Checking everything for a last time and then then...
 Airborne again ! ! !
I've crashed many times already but I consider crashing part of the learning curve.
Flying the E-sky Honeybee FP is a lot more difficult than flying a coaxial helicopter but I'm starting to get the hang of it.
Flying this helicopter is a certain feeling that you have to become used to. It's like learning to ride a bicycle. Once you get it, you cannot unlearn it. It takes practice to improve.
(pictures my bro and me)
maandag 27 juli 2009
The E-Sky Honeybee FP. (Fixed Pitch)
 A package came in. Yeah my new helicopter has arrived.
 Let's see what's in this box. Some spare parts and a training set.
 Nice picture on the box. Would the content of the box be as good ?
 Flying manual + Simulator software + List of all parts used in the Honeybee FP.
That looks great !!!
 It came with a lipo battery. I ordered an other type of battery at the same time but I can't charge that one. I've got no charger. It also came without an adapter for the lipo charger. I had one for the E-Sky Dauphin.
 Posing while it's still undamaged ;-))
 With the training set installed. Ready for its maiden flight.
That didn't end up well !
maandag 20 juli 2009
The Casio Pathfinder PAW-1500 T - Part 5 (final part) - Pros and Cons
After having worn the watch for some time, I made a list with pros and cons :
PROs
PROs
- Very clear readable (BIG) digits for the time and other main fuctions.
- Versatile watch. I don't think there's another watch at this moment that is packed whith so many features.
- Once you've done the initial settings, the watch is easy in its use.
- Price versus quality = good
- Easy to use (big) push buttons.
- Atomic timekeeping
- Tough Solar - Your battery won't die on a trip !
- The atmospheric tendency graph is useful to "more or less" forecast the weather.
- It's a very lightweight watch.
CONs
- The sound of the alarm and countdown timer is too faint.
- The plastic case degrades the watch - certainly in combination with the titanium bracelet.
- When on your wrist (and that's where it is supposed to be), the watches' temperature reading is influenced by your body warmth and therefore useless.
- Since the altimeter uses barometric pressure to calculate altitude, its reading is incorrect when there's a sudden change in atmospheric pressure not due to your ascent or descent. So you're never sure if the altitude reading is correct.
- You can't see the transmitter from witch the watch picks up the time calibration signal. (some G-shock do show the transmitter) (There are parts of the world where you can't receive any transmitter.)
If you're planning to buy the Casio Pathfinder PAW-1500 T, I hope this review has helped you somehow in making a decision.
I certainly love wearing this unique timepiece !
woensdag 15 juli 2009
The Casio Pathfinder PAW-1500 T - Part 4 - Altimeter-Barometer-Compass
 1. Compass.
When you push the compass button, this is the kind of reading you get :

In this example the 12 'oclock position points almost south (175 degrees) . The small black rectangles point to the main directions.
 North is indicated by 3 rectangles.
The compass points to the magnetic north. At some places on earth you might need to correct the reading in order to be accurate. You can perform a magnetic declination corretction with the watch.
 The compass updates its compass reading every second but after 20 seconds it stops. You will have to press the compass button again for another reading.
2. Barometer + Thermometer.
 The barometer reads atmospheric pressure.
  The black rectangle in the picture above shows the difference between the actual barometric pressure reading and the last stored reading. Here it's +1 hPa since last stored reading.
3. Altimeter.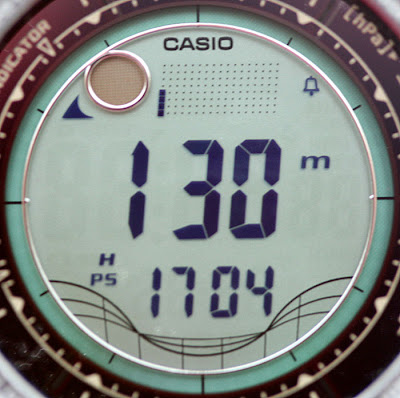 The altimeter gives an indication of your altitude. It uses air pressure and goes up or down with an inclination of 5 metres. You will need to calibrate it first or you can set the altitude to zero.
  It has a graph.

I will do one more post on the Casio Pathfinder PAW-1500 T .
 The barometer reads atmospheric pressure.
 (hPa = Hecto Pascal)
There's also a tendency graph. It shows previous measurements for up to 20 hours.
The thermometer reads in Celcius or Farenheit. When you wear the watch, the temperature reading is influenced by your body heat.
 The black rectangle in the picture above shows the difference between the actual barometric pressure reading and the last stored reading. Here it's +1 hPa since last stored reading.
3. Altimeter.
 The altimeter gives an indication of your altitude. It uses air pressure and goes up or down with an inclination of 5 metres. You will need to calibrate it first or you can set the altitude to zero.
 Then you can hold track of your ascent and descent.
 It has a graph.
I will do one more post on the Casio Pathfinder PAW-1500 T .
After having the watch for some time now, I will make a list of its pros and cons.

vrijdag 10 juli 2009
Small technical update - Esky Dauphin
 Spare parts came in. A new inner shaft + new fly bar (stabilizer) + new gear for the upper blades.
 The disassembled Dauphin.
 The new wheel fits perfectly.
 The assembled Dauphin. It didn't come of the ground :-((
 I reversed the blades. A-blades should be the upper blades. B-blades the lower blades.
It flies much better and smoother. I have right yaw again. Though the nose still tends to go left and the trim is in its extreme right position.
This must be due to a difference in power between both motors but I can control the helicopter perfectly.
Oh, Yes, I ordered my second electric RC helicopter yesterday. A small step up the ladder in rc helicopter flying...
I'm sure I'm gonna post pictures !
Abonneren op:
Posts (Atom)


